When to Replace Your Boat Impeller: The Complete Maintenance Guide
- Dec 24, 2025
- 11 min read
When should you replace your boat impeller? The safest rule is every 100 hours or once a year, whichever comes first. But if you run in sandy water, shallow mud, or heavy weeds, or your boat sits for long stretches, you may need to replace it sooner. Wait too long and you're looking at overheating, expensive engine damage, and ruined days on the water.
Your impeller is one of the smallest parts in your engine, but it protects one of the biggest investments on your boat. In this guide, marine mechanic and inventor Eddie Protzeller breaks down how impellers fail, the warning signs to watch for, what shortens their life, and how to make impeller replacement faster and easier, before a breakdown leaves you stranded. Table of Contents
What Your Impeller Does (And Why It Matters)
Your boat's impeller is a small rubber part with flexible vanes that spins inside your water pump. Its only job? Keep your engine from melting down.
Here's how it works. The impeller spins and pulls cool water from outside your boat. That water flows through your engine, or through a heat exchanger if you have a closed cooling system. It carries away the heat, then exits through the exhaust. Simple.
Without a working impeller, your engine overheats in minutes. Gaskets warp. Seals fail. Metal expands and cracks. In the worst cases, your engine block cracks or your head warps, repairs that run into the thousands.
Think of your impeller like the water pump in your car, except your boat's impeller works harder. It runs every single time your engine runs. And unlike your car's water pump, it's flexible rubber that breaks down over time.
The worst part? Most boaters never think about their impeller until it fails. And when it fails on the water, you're looking at an expensive tow, a ruined trip, and possibly serious engine damage.
Warning Signs Your Impeller Is Failing
Your boat talks to you. You just need to know what to listen for.
The early warning signs. Weak water flow is your first clue. Some boats have a telltale stream, a small stream of water that exits while the engine runs. It should be strong and steady. If it's weak, dribbling, or stops completely, your impeller is struggling. You might also see more steam than usual from the exhaust, or have trouble idling or getting up to speed.
Strange noises come next. A clicking, squeaking, or grinding sound from the water pump area means your impeller vanes are damaged and hitting the pump housing as they spin.
Rising temperature is your final warning. The gauge climbs higher than normal. The overheat alarm sounds. At that point, shut down immediately.
For the full breakdown of how and why cooling systems fail, read Why Do Boat Impellers Fail?.
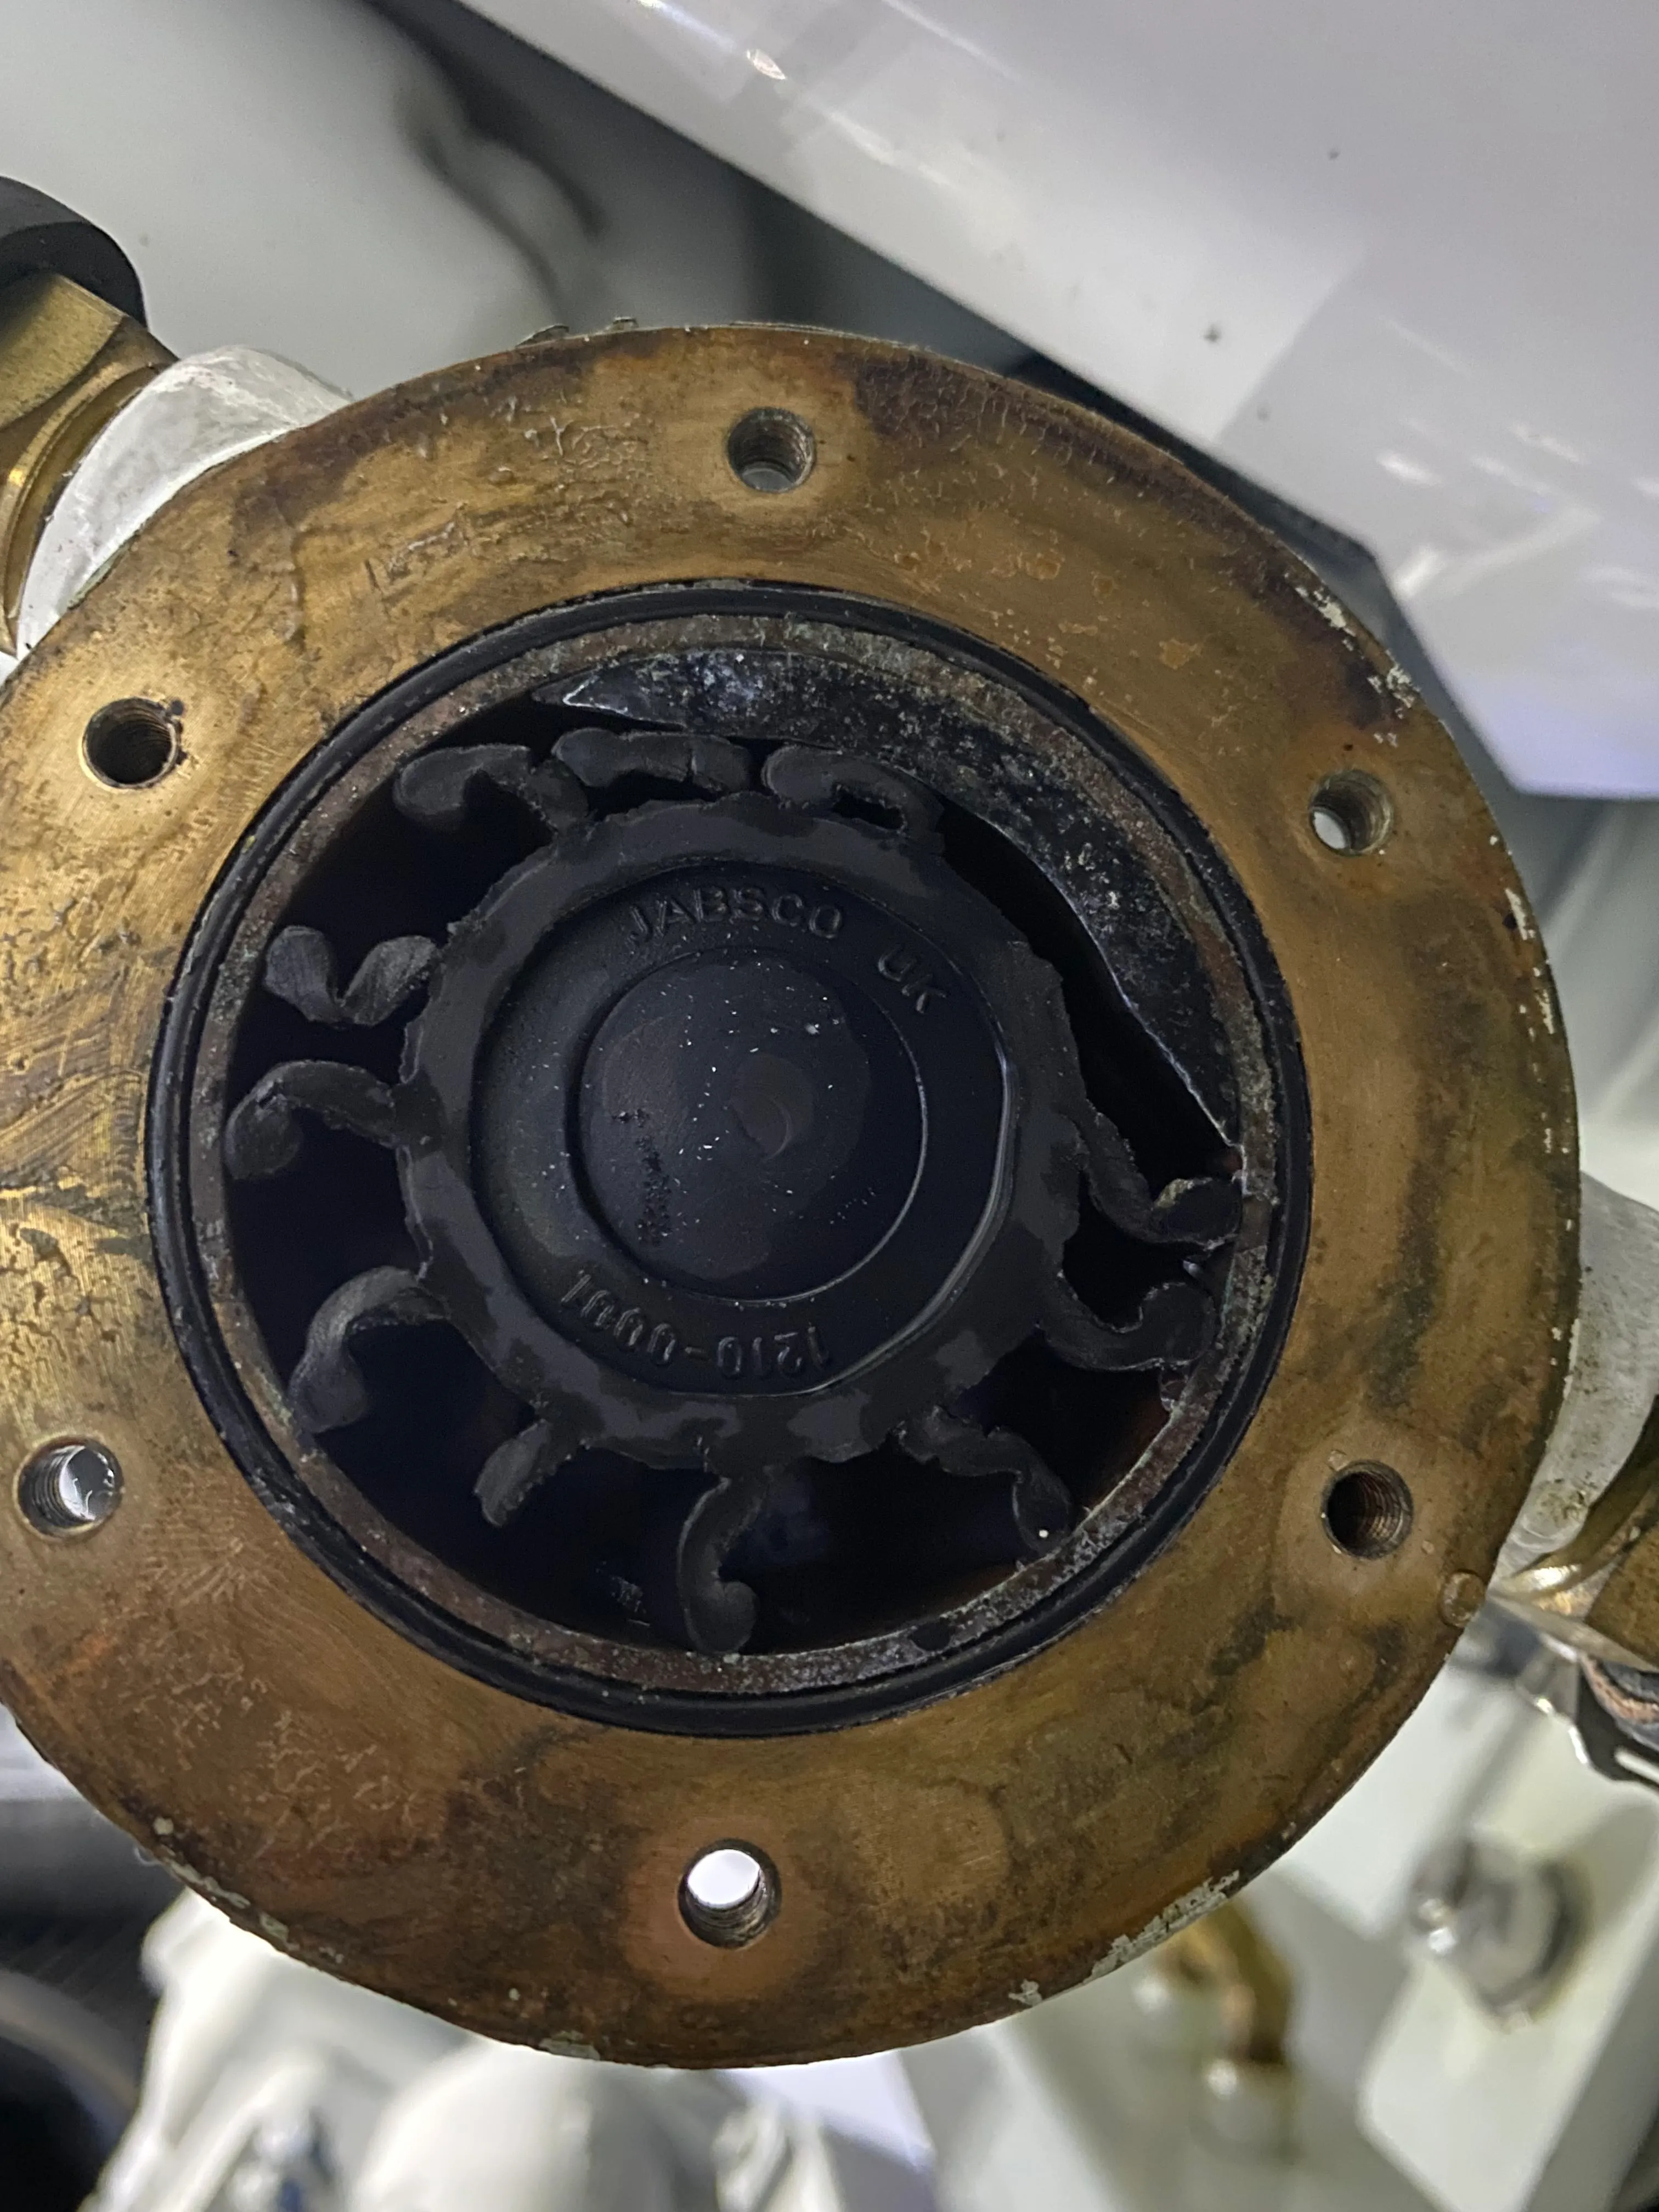
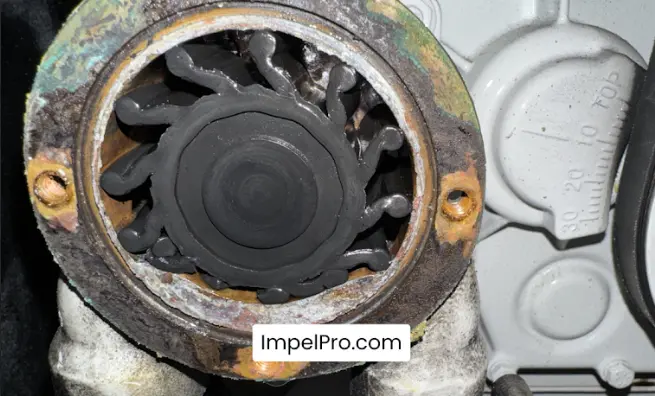
What you'll see when you pull a failed impeller.
A healthy impeller has straight, flexible vanes. A failing one tells a different story:
Cracked vanes: small splits that will soon break completely
Set vanes: vanes bent permanently in one direction that won't straighten
Missing pieces: chunks of rubber floating in your cooling system
Hard, brittle rubber: the impeller feels stiff instead of flexible
Glazed surface: shiny, melted-looking rubber from overheating
See any of these? Replace the impeller now. Don't try to squeeze out "just one more trip." That's how you end up stranded.

If you see any of these signs, replace the impeller immediately. Don't try to squeeze out "just one more trip." That's how you end up stranded.
When to Replace Your Impeller: The Real Schedule
Ask ten boaters when to replace an impeller and you'll get ten different answers. Some say every year. Others claim three years is fine. So what's the truth?
The Standard Rule
Replace your impeller every 100 hours or once a year, whichever comes first.
That's what most manufacturers recommend, what marine mechanics follow, and the safest approach.
Why once a year even if you barely use your boat? Because rubber breaks down whether you run the engine or not, and sitting is actually worse. It dries out, it cracks, it loses flexibility.
The "every three years" myth
You'll hear experienced boaters say they go three years with no problems. Some get away with it, if they're lucky and their conditions are perfect.
But here's what they're not telling you: they're gambling. The cost of a new impeller is around $40 to $150. The cost of an overheated engine is potentially thousands. The math is simple.
When to Replace More Often
Some conditions destroy impellers faster. Replace sooner if you:
Boat in sandy or muddy water: sediment acts like sandpaper on the vanes
Run in brackish or salt water: salt accelerates rubber breakdown
Run in weedy areas: plants wrap around the vanes and tear them
Store your boat dry through winter: long periods without water crack the rubber

Special Cases
You bought a used boat? Replace the impeller immediately. You don't know its age or condition. Consider it part of your purchase cost.
Planning a long cruise? Install a fresh impeller before you leave. Carry a spare. It's cheap insurance.
What Kills Impellers (And How to Prevent It)
Understanding what destroys impellers helps you avoid problems before they start. For the deep dive on each failure mode, see Why Do Boat Impellers Fail?.
Dry Running: The Instant Killer
Running your engine without water, even for 30 seconds, can wreck an impeller. The rubber heats up, melts slightly, and sticks to the pump housing, then the vanes tear when you run it again. It happens when you flush with the flush port closed, run on a trailer without a flush attachment, suck air through a weed-clogged intake, or run with water levels low enough to expose the intake.
Prevention: always verify water flow before you start the engine. On a trailer, use a proper flush attachment. Never assume water is flowing.
Debris Damage: The Slow Killer
Sand, mud, and plant material work like sandpaper inside the pump. Each particle grinds away tiny bits of rubber until the vanes get thin, crack, and break.
You can't always avoid debris, but you can minimize it:
Check your intake screen regularly
Rinse the cooling system with fresh water after sandy runs
Avoid stirring up bottom sediment in the shallows
Replace the impeller more often if you boat in dirty water
Age and Storage: The Silent Killer
Rubber deteriorates whether you use it or not. Sunlight, ozone, heat, and time all break down its structure. An impeller that sits for two years might look fine and crack the first time you run it.
If your boat sits for months at a time, the best approach is to replace the impeller at the start of each season, before your first trip. A note on winter storage: many boaters ask about pulling and storing the impeller over winter. With the ImpelPro puller, the old impeller goes straight to the trash, because the teeth grip the rubber to pull it and damage it in the process. That's not a downside. An impeller that sat all winter in the pump is already compromised: the vanes have been flexed in one position for months and the rubber has dried out. For the cost of a replacement, you start the season with a known-good part.
Smart boaters follow this schedule:
Spring: install a fresh impeller before launching
During season: inspect at mid-season if you run heavily
Fall: leave the old impeller in place through winter
Next spring: pull and discard the old one, install a new one
Using the wrong lubricant destroys an impeller fast. Always use a water-based or glycerin-based lubricant on the impeller. Never use petroleum products like oil or grease, which make the rubber swell and break down. (This is about the impeller itself. Light oil on the puller's threads is fine.)
Chemical Damage
Using the wrong lubricants can destroy an impeller fast. Always use water-based or glycerin-based lubricant. Never use petroleum products like oil or grease—they cause rubber to swell and break down.
Make Impeller Changes Easy
Changing an impeller shouldn't take two hands, three tools, and a yoga certification. The ImpelPro impeller puller makes the job simple, even in tight spaces where you can barely fit your hand. It was designed by a marine mechanic who got tired of fighting stubborn impellers, and it works where other tools fail.
Learn more about the ImpelPro difference.
Tools You Need for Easy Impeller Changes
The right tools turn a frustrating job into a 15-minute task. (For your full on-board kit and spares, see Boater Toolbox Essentials.)

Essential Tools
Tape measure (measure the impeller diameter vane to vane)
ImpelPro impeller puller (Standard or Large, depending on your impeller)
9/16" socket or wrench (engages the puller's bearing system)
Spare impeller kit (keep one on board always)
Water-based lubricant (for installing the new impeller)
Socket set (for the pump cover screws)
Shop towels (things get wet)
Why You Need a Proper Puller
Many boaters try pliers, screwdrivers, or picks. That usually fails or damages the back seal or pump housing, because the impeller grips the shaft tight and the vanes bend and tear when you pull at the wrong angle.
The ImpelPro puller solves that:
Sharp teeth bite the rubber for a secure grip
The bearing system spreads the pulling force evenly as you wind the impeller out
It works one-handed in tight spaces
It fits common impeller sizes from generators and sailboats to large yachts
Always follow your engine manufacturer's instructions when servicing your cooling system. This guide is general information, and your specific engine may have unique requirements.
How to Replace Your Impeller in Minutes
Changing an impeller isn't complicated. Here's the basic process. (For the full step-by-step with the stuck-impeller tricks, see How to Remove a Stubborn Impeller.)
Shut off the water. Turn off the engine and make sure nobody can start it. Open the engine compartment, find the seacock or through-hull valve, and close it to stop the water flow.
Remove the pump cover. Take out the screws holding the faceplate, and keep track of them, they love to roll into dark corners. Note which way the cover comes off so it goes back the same way, which avoids leaks.
Pull the old impeller. This is where most people struggle. Insert the ImpelPro puller into the pump, clear of the cam. Tighten the thumbscrew so the arms grip the impeller hub, then turn the rod with a 9/16" socket. The bearing system winds the impeller straight off the shaft.
Inspect the pump housing. Look inside for rubber chunks from the old impeller. Run your hand inside to feel for scratches or corrosion. Clean everything thoroughly.
Lubricate the new impeller. Coat the vanes with water-based lubricant so they slide into the housing without tearing.
Install the new impeller. Fold the vanes over and push the impeller onto the shaft. They'll settle into the housing, and they self-correct once you turn the engine over, so there's no need to line them up in a certain direction.
Replace the cover. Use a new gasket if needed, and tighten the screws in a cross pattern for an even seal.
Open the seacock again. Don't forget to turn the water back on.
Test it. Start the engine, check for strong water flow, watch the temperature, and touch the pump cover to confirm it's cool.
Watch It Done
Seeing is believing. Watch Eddie change an impeller start to finish, even in a tight space: Large Impeller in Action. For detailed step-by-step instructions with photos, see our complete ImpelPro user guide.
Be Ready—Not Stranded
Here's a scenario that plays out every weekend: a boat breaks down miles from the marina. The engine overheated. The impeller failed. The owner doesn't have a spare or the tools to change it. Now they're waiting hours for a tow, their day is ruined, and they're paying hundreds for something they could have fixed in 15 minutes.
Why Boaters Skip Impeller Maintenance
We hear the same reasons over and over:
"I can't reach my water pump." Engine compartments are cramped and pumps hide in corners. One hand barely fits. Two hands? Nearly impossible.
"I'll just have my mechanic do it." Fine, until you're 20 miles offshore, or it's Sunday and the shop is closed, or you're on a lake with no marine services.
"I tried once and couldn't get the impeller out." Incredibly common. Impellers stick to the shaft, pliers slip off, and you end up tearing the rubber and giving up.
"It seems fine, so why bother?" Because impellers don't give much warning. They work fine, then suddenly they don't, and by then the engine is already overheating.
The Cost of Being Unprepared
A new impeller: $40 to $150 The ImpelPro puller: $169 to $189 A tow: $300 to $800 Engine damage: $2,000 to $10,000+
Do the math. Being prepared costs less than a tank of gas.
Your Impeller Maintenance Kit
Keep these on board every trip:
A spare impeller (in a sealed bag so it doesn't dry out)
The ImpelPro puller
A 9/16" socket or wrench
Water-based lubricant
Basic screwdrivers
Shop towels
Your water pump manual
Store it all together in a waterproof bag, label it, and tell your crew where it is.
Don't Get Caught Without the Right Tool
The ImpelPro impeller puller was designed by a marine mechanic who needed a tool that actually works in real engine compartments. Sharp teeth grip tight, the bearing system pulls straight, and it works one-handed where other tools fail.
Choose your size:
Standard Puller: for most inboard impellers, generators, and large ballast pump impellers Large Puller: for larger boats, sportfishing boats, and yachts
Buy the ImpelPro Standard Puller
Buy the ImpelPro Large Puller FREE: Printable Boat Maintenance Checklist Never forget critical maintenance again. Download our complete seasonal checklist—including impeller inspection schedules, tool lists, and maintenance logs.
Your Peace of Mind Starts Here
Your boat is your escape, your freedom, your investment. Protecting it doesn't take complicated procedures or expensive service appointments. It takes attention to the small things that matter, and the impeller is one of them. It costs less than dinner out, it takes 15 minutes to change, and it's the difference between a great day on the water and an expensive disaster.
Check your impeller regularly. Replace it on schedule, or sooner if conditions demand it. Keep a spare on board. And invest in a tool that makes the job simple instead of frustrating. Do that, and you'll avoid costly repairs, prevent breakdowns, and spend more time enjoying the water instead of worrying about it.
Safety note: always follow your engine manufacturer's service procedures and safety guidelines. Shut off the engine before working on cooling system components. Wear eye protection when removing pump covers, since stored pressure can spray water. If you're unsure about any step, consult a qualified marine mechanic or reach out to us at customercare@impelpro.com See the full lineup of ImpelPro impeller pullers at impelpro.com
Common Questions:
Q: How often should you replace a boat impeller?
A: Replace your boat impeller every 100 hours or once a year, whichever comes first. Replace it sooner if you run in sandy, muddy, salty, or weedy water, or if your boat sits unused for long periods, since those conditions break the rubber down faster. Always follow your manufacturer’s manual.
Q: Should you replace a boat impeller every year even if you rarely use the boat?
A: Yes. Rubber degrades whether you run the engine or not, and a boat that sits can actually be harder on the impeller, because the vanes take a set and the rubber dries out. Replacing once a year keeps a known-good part in the pump.
Q: Do you need to replace the impeller on a used boat?
A: Yes. Replace the impeller as soon as you buy a used boat, because you don't know its age or condition. Treat it as part of the purchase cost and start with a known-good part.
Q: How much does it cost to replace a boat impeller?
A: A replacement impeller usually runs about $40 to $150, far cheaper than an overheated engine, which can cost thousands. Replacing on schedule is inexpensive insurance.
About the Author
Eddie Protzeller is a Seattle tugboat and yacht mechanic, and the inventor of the ImpelPro® Impeller Puller. With 15 years of hands-on experience servicing inboard engines and generators, he designed ImpelPro after struggling to remove a severely stuck impeller in a tight engine compartment. He specializes in boat cooling systems and impeller maintenance. For more about Eddie, visit About Us.


Comments