How to Remove a Stubborn Impeller: Step-by-Step Guide from a Marine Technician
- Dec 4, 2025
- 8 min read
Updated: Mar 9
Written by Eddie Protzeller, Marine Mechanic & Inventor of ImpelPro® Impeller Puller.

You're crammed into your engine compartment, arms twisted at impossible angles, and that impeller won't budge. Sound familiar? You're not alone—stuck impellers are one of the most frustrating maintenance tasks for inboard boat owners. But here's what most guides won't tell you: the reason your impeller is stuck often comes down to timing, not force.
I'm Eddie Protzeller, a tug boat and marine technician from Seattle who spent years working on everything from commercial vessels to weekend cruisers. After removing thousands of impellers—many of them stubbornly seized—I designed the ImpelPro Impeller Puller specifically for the tight-space challenges that inboard engines present.
In this guide, I'll walk you through exactly how I remove stuck impellers, including the critical timing tip that makes the difference between a 10-minute job and a battle.
Why Impellers Get Stuck (And the #1 Mistake That Makes It Worse)
Before we get to the removal steps, understanding why impellers seize will help you prevent it—and make today's job easier.
The timing factor most boaters don't know: The moment you close that seacock, the clock starts ticking. Water inside the pump acts as a lubricant between the rubber impeller and the brass housing. Let that water drain or evaporate, and the rubber bonds to the metal. I've seen impellers go from easy-pull to completely seized in as little as 30 minutes of sitting dry.
The rule: Close the seacock, then remove the impeller immediately. Don't close both seacocks on a twin-engine boat and let one side sit open while you work on the other. Do them one at a time.
Other factors that accelerate impeller wear and seizure:
Sandy or silty water — Abrasive particles score the housing and impeller, creating more surface area for bonding
Saltwater environments — Corrosion and mineral deposits accelerate the bond
Dry-starts — Even a few seconds of running without water can melt impeller tips and fuse them to the housing
Age — Rubber compounds harden over time; older impellers are significantly harder to remove
Infrequent use — Boats that sit for months develop stronger rubber-to-metal bonds
What You'll Need Before You Start
Gather everything before you close that seacock—remember, time is your enemy once the water stops flowing.
Tools:
Impeller puller (sized for your impeller—see note below)
9/16" wrench or socket
Screwdriver or socket set for pump cover screws
Clean rags
Container to catch water
Supplies:
Replacement impeller (matched to your pump model)
New gasket (if not included with impeller)
Glycerin or marine-grade lubricant (often included in impeller kits)
Thread lubricant for the puller
About impeller puller sizing: The ImpelPro Impeller Puller comes in two sizes: Standard (for impellers 1 9/16” to 2 9/16" diameter) and Large (for impellers 2 9/16" to 4 5/8" diameter). Using the wrong size won't provide proper grip on the impeller hub as the arms on the larger puller are recessed and won’t grip a small impeller.
Step-by-Step: Remove a Stubborn Impeller Like a Pro Step 1 — Close the Seacock and Work Fast
Locate your raw water intake through-hull valve (seacock) and close it completely. This prevents water from flooding the bilge when you open the pump.
Critical timing reminder: You now have a limited window before the impeller starts bonding to the housing. Have your puller ready and move to the next step immediately. Don't walk away to grab a sandwich.
If you have twin engines, complete the entire impeller replacement on one engine before closing the seacock on the second. Never leave a pump sitting dry while you work on another.
Step 2 — Remove the Pump Cover and Expose the Impeller
Remove the screws securing the pump's end cover (faceplate). Set them somewhere safe—dropping a screw into the bilge is a time-honored boating tradition you want to avoid.
Carefully remove the faceplate and gasket. Some water will drain out; this is normal. Set the gasket aside if you plan to reuse it, though I recommend using a fresh gasket with every impeller change.
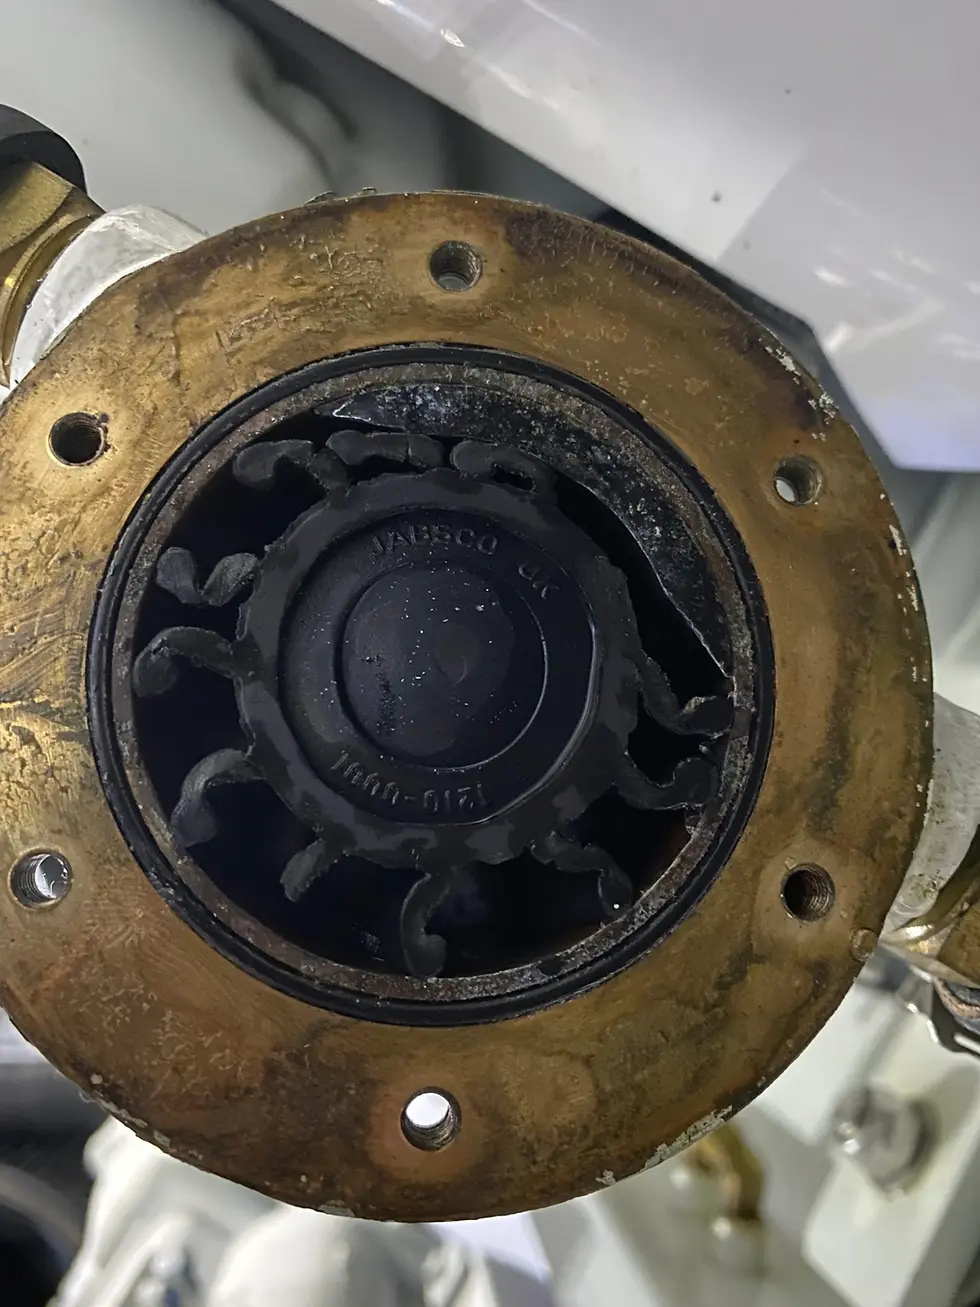
You should now see the impeller sitting inside the circular pump housing.
Step 3 — Locate the Cam (Critical for Tool Placement)
Before inserting your puller, identify the cam inside the pump housing. The cam is the raised, half-moon-shaped section that makes the inner circle slightly off-center. This is what compresses the impeller vanes to create water flow.
Why this matters: If you position your puller arms directly over the cam, you won't get proper leverage, and you risk damaging the tool. The cam creates an uneven surface that prevents the arms from gripping evenly.
Find two points on the impeller that are:
Directly across from each other
NOT over the cam
Centered in the housing
This ensures the puller's threaded rod aligns with the center of the impeller shaft.


Step 4 — Set Up Your Impeller Puller Correctly
Proper setup is the difference between effortless extraction and frustration. Take an extra minute here to save yourself 20 minutes of struggling.
ImpelPro Impeller Puller Setup:
Lubricate the threads — Apply any lubricant (WD-40, marine grease, even cooking oil) to the puller's threaded rod. This reduces friction during extraction.
Start with arms parallel — Position both arms parallel to each other before insertion.
Adjust arm spacing — Use the knurled thumbscrew to spread or narrow the arms to match your impeller diameter.
Set the threaded rod flush — Adjust the threaded rod so the tip is flush with the bottom of the strong back (the crossbar). You want the rod to contact the impeller shaft with minimal turning.
Insert and seat the arms — Lower the puller into the pump housing, positioning the arms on opposite sides of the impeller hub (avoiding the cam as discussed above).
Tighten the thumbscrew — Hand-tighten the knurled thumbscrew to lock the arms onto the impeller. The arms should grip firmly—don't be shy here.
Verify centering — The threaded rod should be centered over the impeller shaft. If the tool looks angled or off-center, reposition and try again.
Important: The ImpelPro puller's bearing system means the rod can turn freely while applying downward force—this is by design. If your puller doesn't have this feature, you'll fight the threads the entire way.
Step 5 — Extract the Impeller
Turn the threaded rod by hand until you feel it contact the impeller shaft.
Switch to your 9/16" wrench or socket. Continue turning the rod clockwise.
The mechanical advantage of the threads will push against the shaft while the arms pull the impeller up and out.
If the impeller doesn't move after several turns, stop. Back off the rod, verify the arms are properly seated, re-tighten the thumbscrew, and try again. Forcing a misaligned puller can damage the tool or pump.
Once the impeller breaks free, continue turning until it's fully extracted.
If you're using the ImpelPro puller: The bearing system eliminates the bind that happens with conventional pullers. You should feel steady, progressive movement with each turn. If you feel the rod binding or the whole tool spinning, the arms aren't gripping—reset and try again.
Step 6 — Inspect, Clean, and Install the New Impeller
Inspect the old impeller:
Count the vanes—are any missing?
Look for cracks, tears, or melted tips
Check the hub for damage
If vanes are missing: They're somewhere in your cooling system. Check the pump housing, raw water hoses, strainer, and heat exchanger. A loose vane can block water flow and cause overheating even with a new impeller installed.
Clean the pump housing:
Remove any debris, old gasket material, or rubber fragments
Inspect the housing for scoring or damage
Wipe the wear plate (the flat surface the impeller rides against)
Install the new impeller:
Apply glycerin or the lubricant from your impeller kit to the impeller vanes and the inside of the pump housing
Note the direction of the vanes on the old impeller (though they'll self-correct when the engine starts)
Slide the new impeller onto the shaft, aligning the key or spline
Push firmly until seated—the vanes will compress as they enter the housing
Step 7 — Reassemble and Test
Position a new gasket on the pump housing (use gasket sealant if specified by your pump manufacturer)
Replace the faceplate and tighten screws evenly in a cross pattern
Open the seacock — This is the step people forget, leading to immediate overheating
Start the engine and verify water is exiting the exhaust
Check the pump housing for leaks
Let the engine run for several minutes and monitor temperature
Download the Complete Instructions
Want a printable version you can take to the boat? Download our free PDF guide with all the steps, plus detailed diagrams.
The ImpelPro Difference: Why Proper Tool Setup Matters
I designed the ImpelPro Impeller Puller after years of fighting stuck impellers in the cramped engine compartments of commercial fishing boats. The tools that existed either couldn't fit in tight spaces or required so much force that something usually got damaged.
What makes ImpelPro different:
Built for inboard engines: Most pullers are designed with outboards in mind, where you have room to work. The ImpelPro's compact profile fits where other tools can't—between stringers, around hoses, in the spaces where inboard raw water pumps actually live.
The bearing system: Conventional pullers create binding friction as you turn the rod—the harder you push, the harder it is to turn. Our integrated bearing system eliminates this. The rod spins freely under load, so all your effort goes into extraction, not fighting the threads.
Aluminum alloy & 316L stainless steel construction: This isn't a tool you'll replace in two seasons. Marine-grade stainless resists the corrosion that destroys lesser tools.
When people have trouble with the ImpelPro puller, it's almost always setup:
Arms not centered (usually positioned over the cam)
Thumbscrew not tight enough
Rod not lubricated
Trying to force a misaligned pull
Take the extra minute to set up correctly, and the impeller will come out.
Watch Eddie Remove an Impeller in Under 5 Minutes
Still not sure about the process? Watch the full demonstration where I remove an impeller from a tight engine space using the ImpelPro puller—including setup, extraction, and installation of the new impeller.
Frequently Asked Questions
How often should I replace my impeller? Most manufacturers recommend annual replacement, regardless of hours. Rubber compounds degrade over time, and an impeller that looks fine can fail without warning. If you operate in sandy or silty water, or if you've had any dry-start incidents, replace it sooner.
My impeller is completely seized—what now? First, make sure you're not fighting the cam (see Step 3). If the impeller genuinely won't move with proper puller setup, try these approaches:
If the engine is not overheating, put the face plate to the pump back on, open the seacock and start the engine briefly to break the bond (the rotation can free a seized impeller)
Prevention is easier: never let a closed pump sit dry, and replace impellers annually before they have a chance to seize.
Can I use screwdrivers instead of a puller? You can, but I don't recommend it. Prying with screwdrivers often scores the soft bronze pump housing, which leads to leaks. It's also awkward in tight spaces and risks hitting the back seal leading to leaks.. A proper puller pays for itself the first time you don't have to replace a damaged pump.
Why didn't my puller work? The most common reasons:
Arms positioned over the cam — The tool can't grip evenly
Not centered — The threaded rod needs to align with the shaft center
Thumbscrew not tight enough — The arms slip instead of pulling
No thread lubrication — Dry threads bind under load
Wrong size puller — Arms can't reach the impeller hub properly. For example, the ImpelPro Large Puller has recessed arms that cannot grip a small puller because only a few teeth would touch it
Reset the tool following the steps in this guide, and try again. Proper setup makes all the difference.
Ready to Make Impeller Replacement Easy?
The ImpelPro Impeller Puller was designed by a marine technician for the tight spaces and stubborn impellers you actually deal with. Stop fighting your maintenance—get the right tool.
Standard Puller — For impellers 1 9/16" to 2 9/16” in diameter
Large Puller — For impellers 2 9/16" to 4 5/8" in diameter
Designed, Engineered, Assembled in the USA from Aluminum Alloy and 316L stainless steel. 7-year limited warranty against manufacturing defects.
Questions? Visit our FAQ page or explore our Learning Area for more maintenance guides.
Eddie Protzeller is a Seattle-based tugboat mechanic, marine mechanic, and the inventor of the ImpelPro® Impeller Puller. With 15 years of hands-on experience servicing inboard engines and generators, Eddie designed ImpelPro after struggling to remove a severely stuck impeller in a tight engine compartment. He specializes in boat cooling systems and impeller maintenance.
For more information about Eddie, please visit About Us.


Comments