Why Do Boat Impellers Fail? Warning Signs, Causes, and Prevention
- a few seconds ago
- 14 min read
Intro
The temperature needle climbs. The alarm starts screaming. And just like that, your day on the water is done.
Nine times out of ten, the troublemaker is a rubber part about the size of your fist, tucked inside the raw water pump. It does the thankless job of shoving cooling water through your engine, and when it quits, your engine starts cooking itself in a hurry.
Here is the good news, and it is the reason this whole page exists. Impellers almost never blindside you. They leave a trail of breadcrumbs before they go. Learn to read them and you will catch trouble long before you are drifting offshore, dialing for a tow.
So let's walk through why impellers fail, where cooling systems tend to give out, and how to keep a small rubber part from ruining a good weekend. None of this is complicated. You can absolutely do this yourself.
On this page:
What an impeller does
The two most common cooling system failure points
Why impellers fail
Early warning signs
How to prevent impeller failure
Safe impeller removal
Tools designed for damage-free removal
Key takeaways
What Does an Impeller Do?
The impeller is the little rubber part inside your raw water pump that pulls cooling water into the engine and keeps temperatures where they belong. Inboard engine or generator, same deal: this flexible, vane-style part is what keeps the water moving.
To do that, the blades flex and snap back thousands of times an hour as they spin inside the housing. That constant flexing is what makes the impeller work. It is also what wears it out, which is exactly why its failures are so easy to predict once you know the patterns.
The Two Points Where Boat Cooling Systems Usually Fail
Nearly every raw water cooled marine engine, no matter the brand, runs the same basic cooling layout. And across thousands of service calls, the same two spots fail over and over:
Raw water flow restriction upstream of the pump
Impeller damage inside the raw water pump
When either one goes, cooling drops off fast and damage follows close behind. Sure, thermostats, exhaust risers, and hoses can act up too. But the vast majority of overheating traces back to one of those two: something choking the water flow, or a beat-up impeller.

Most raw water–cooled marine engines—regardless of brand—share the same basic cooling system layout, which is why impeller failures tend to happen in the same places across different boats.
Check out this video:
What Happens If a Boat Impeller Fails?
When a boat impeller fails, it stops pumping enough raw water to cool the engine, and the engine starts to overheat within minutes. Left alone, that heat can warp components, damage the exhaust system, and leave you stranded. The warning usually comes first: a weak exhaust stream, a rising temperature gauge, black rubber bits in the sea strainer, or a rubber smell in the engine room. Shut the engine down the moment you notice any of them, because the damage builds fast once cooling drops off.
Why Impellers Fail (What's Actually Happening Inside the Pump)
An impeller lives in one of the meanest neighborhoods on your boat. Constant flexing, big temperature swings, grit, chemicals, and the occasional dry run. The rubber is built to take a beating, but only as long as water flow, lubrication, and operating conditions stay in the normal range.
Push it outside that range and it fails in a few predictable ways. Once you see what is actually happening to the rubber, the real-world causes (sand, salt, dry starts, long storage) start to make a lot of sense.
Heat Damage (The Fast Killers)
Heat is the quickest way to kill an impeller. Cut off the water, even for a few seconds, and the impeller loses the only thing cooling and lubricating it. Friction and temperature spike instantly, and the rubber softens, deforms, blisters, or flat-out melts.
Usual suspects:
Running the engine dry
A closed or half-closed seacock
A blocked hull intake
Debris choking the flow
It shows up two ways:
Blocked intake. No water reaches the pump at all, usually a closed seacock or a plugged hull intake. This one overheats fast and wrecks the impeller almost instantly.
Restricted flow from debris. Water gets through, just not enough, thanks to a clogged strainer, hose, or heat exchanger. This one is slower: gradual overheating, less lubrication, rubber breaking down over time.
Either way, a few seconds without proper water flow can ruin an impeller for good, even if you catch it and shut down quick.
Material Breakdown (The Slow Killers)
Not every impeller goes out in a blaze of glory. Plenty of them die quietly, rotting from the inside while the engine runs like nothing is wrong.
Here is what eats at the rubber over time:
Saltwater exposure
Heat cycling and oxidation
Long periods of compression
Months of sitting unused
Salt speeds up the chemistry. Heat cycles bake the moisture out. And an impeller that sits all winter slowly takes a set, hardening into whatever shape it was parked in, like a gym sock left in a locker. By the time it finally cracks, the rubber gave up months ago. That is the sneaky part: it can look perfectly fine and still be toast, which is why you replace it on age, not on looks.
Abrasion & Contamination (The Internal Sandpaper)
Grit is the failure mode nobody thinks about. Suck sand, silt, or fine mud into the cooling system and it circulates right through the pump. Over time those particles sand down the vanes and housing like a piece of 80-grit, adding friction and wear with every rotation.
Where it comes from:
Sandy or silty water
Muddy bottoms
Running shallow near the shoreline
More friction means a hotter impeller and rubber that wears out faster. Add heat to abrasion and you have got an impeller on borrowed time.

Mechanical Damage (Human-Caused Failures)
Some failures are not the water's fault. They are ours.
Sloppy removal can:
Nick or score the brass pump surfaces
Damage rear gaskets and seals
Create leaks
Misalign shafts
Wreck housings
Sloppy installation can:
Cause dry friction at startup
Damage the impeller before it ever spins
Long storage can:
Deform the vanes
Harden the rubber
Seize the impeller onto the shaft
Crack it on restart
None of that comes from the water. It comes from how the impeller got handled and stored. The good news: this is the category you have the most control over.
Why These Failures Are So Predictable
Heat, abrasion, material breakdown, handling damage. It almost always comes back to one thing: the rubber is being asked to do a job outside what it was built for. Choke the water flow and temperatures climb. Add grit and friction climbs. Let the rubber age and harden and it stops flexing. The failure can look like it came out of nowhere, but it was usually building for weeks, months, or seasons.
Which is the whole point: impellers rarely go without warning. Long before a vane melts or tears loose, the cooling system starts dropping hints. They are quiet at first, but they are consistent, and once you know them, they are hard to miss.
Warning Signs: How Your Cooling System Tells You Something Is Wrong
Reading Your Boat’s Warning Language
Every boat talks to you. Some of it is obvious, some of it is a whisper. The difference between catching a problem early and getting caught out is usually just noticing when something normal stops being normal.
Mechanics build that instinct by working on hundreds of engines. You can build the same thing on one engine: yours. Learn your boat's baseline. How fast cooling water shows up at startup. How strong the discharge looks at idle versus cruise. Where the temp gauge likes to sit. What it normally sounds and feels like.
Once you know the baseline, the changes jump out. A longer wait before water hits the exhaust? Could be stiffening vanes that have lost their snap. A weaker stream at the same RPM? The pump is losing its grip on the water. A slow crawl up the temperature gauge? Cooling capacity is fading. None of these trip an alarm right away, and that is exactly why they matter. They are your head start. Catch them and you fix a cheap problem instead of an expensive one.
Early Warning Signs You Should Never Ignore
See any of these? Stop and look closer:
Black rubber bits in the sea strainer or at the discharge. Vanes breaking down or tearing.
Bubbles in the sea strainer while running. Air sneaking into the intake side, robbing you of cooling and lubrication.
Weak or inconsistent exhaust water flow. The pump is not moving water like it should.
Engine temp creeping higher than usual. Cooling is slipping, especially under load.
Squealing, rattling, or grinding from the pump. Friction, dry running, or damage inside.
Rubber smell in the engine room. That is your impeller cooking. Hard to unsmell.
Warm pump face plate to the touch. ⚠️ Shut it down now. This is often the last warning before real damage.
Performance Changes and Heat Symptoms
Ignore the early stuff and the signs get a lot louder.
Stalling or power loss. As the engine heats up, parts expand, friction climbs, and it starts running rough, losing power, or stalling. Some engines drop into a limp mode that cuts output to save themselves.
Steam or serious heat at the exhaust. At idle, a worn impeller may not move enough water. Goose the throttle and the problem hides for a second as pump speed rises, but do not be fooled. That is an impeller about to quit on you.
A Simple Routine to Catch Problems Early
Before every outing: quick glance at the strainer and clamps
On start: confirm discharge flow within 10 to 20 seconds.
Monthly in season: clean the strainer, watch for air bubbles while running.
Annually: replace the impeller, inspect the wear plate, cover, and seals.
If Your Impeller Failed, Ask These Three Questions
Did the engine run dry, even for a second? A quick dry start or a momentary loss of flow is enough to heat-damage an impeller.
Was water flow restricted upstream? Junk at the intake, a half-clogged strainer, or a kinked hose quietly starves the pump and cooks the impeller over time.
Has it been in service longer than recommended? Age, heat cycles, and long compression harden the rubber and steal its flex, even if the engine seemed fine.
Most of the time, at least one of those was true long before the impeller actually let go.
Prevention & Replacement: How to Make Impeller Failure Boring
Preventing impeller failure is not about doing more maintenance. It is about protecting water flow and skipping the small mistakes that quietly do damage. When water moves freely, the impeller stays cool, slick, and flexible. Most failures start the moment that balance gets thrown off.
Protect Water Flow First
The single biggest thing standing between you and a dead impeller is steady water flow. Anytime it drops or stops, the impeller overheats fast. A few habits cover most of it:
Never run the engine dry
Confirm cooling water at the discharge right after startup
Keep the sea strainer clean and sealed
Take it easy in shallow, silty, or junk-filled water
You do not need fancy gauges, just a pair of eyes and a little attention. If the flow looks weaker or slower than usual, stop and figure out why before you keep going.
A Simple Routine That Actually Works
Before every outing: quick look at the pump, strainer, and hose clamps.
On startup: cooling water within 10 to 20 seconds.
Monthly in season: clean the strainer, check for bubbles while running.
Annually: new impeller, and inspect the wear plate, cover, and seals.
Minutes, not hours. And it kills off most of the surprises.
Replace on a Schedule, Not on Symptoms
Impellers wear out slowly, even when the engine feels perfect. Heat, salt, and long compression harden the rubber on their own schedule. By the time you notice symptoms, the damage is usually already done. Swap it on a schedule instead of waiting for warning signs, and you keep failures predictable and the inside of the pump happy. This one goes deeper: Impeller maintenance schedule
The Prevention Mindset
Every time you put a wrench on something, you are either helping it or quietly hurting it. There is no free poke around the engine.
Pull an impeller you did not need to touch, grab the wrong tool, or rush the reinstall, and you can chew up sealing surfaces and gaskets without ever seeing it happen. Those little nicks do not speak up right away. They wait. Then they turn into a leak, an air bubble, or an impeller that dies way too young.
The owners who treat the parts that still work with a little respect, instead of only swapping out what is already trashed, tend to find their maintenance gets... boring. Predictable. Nothing exciting ever happens down there. And in a boat engine room, boring is the highest compliment there is. A routine impeller swap is cheap. A single overheat can turn into hours of troubleshooting, a tow, and repairs that hurt to pay for.

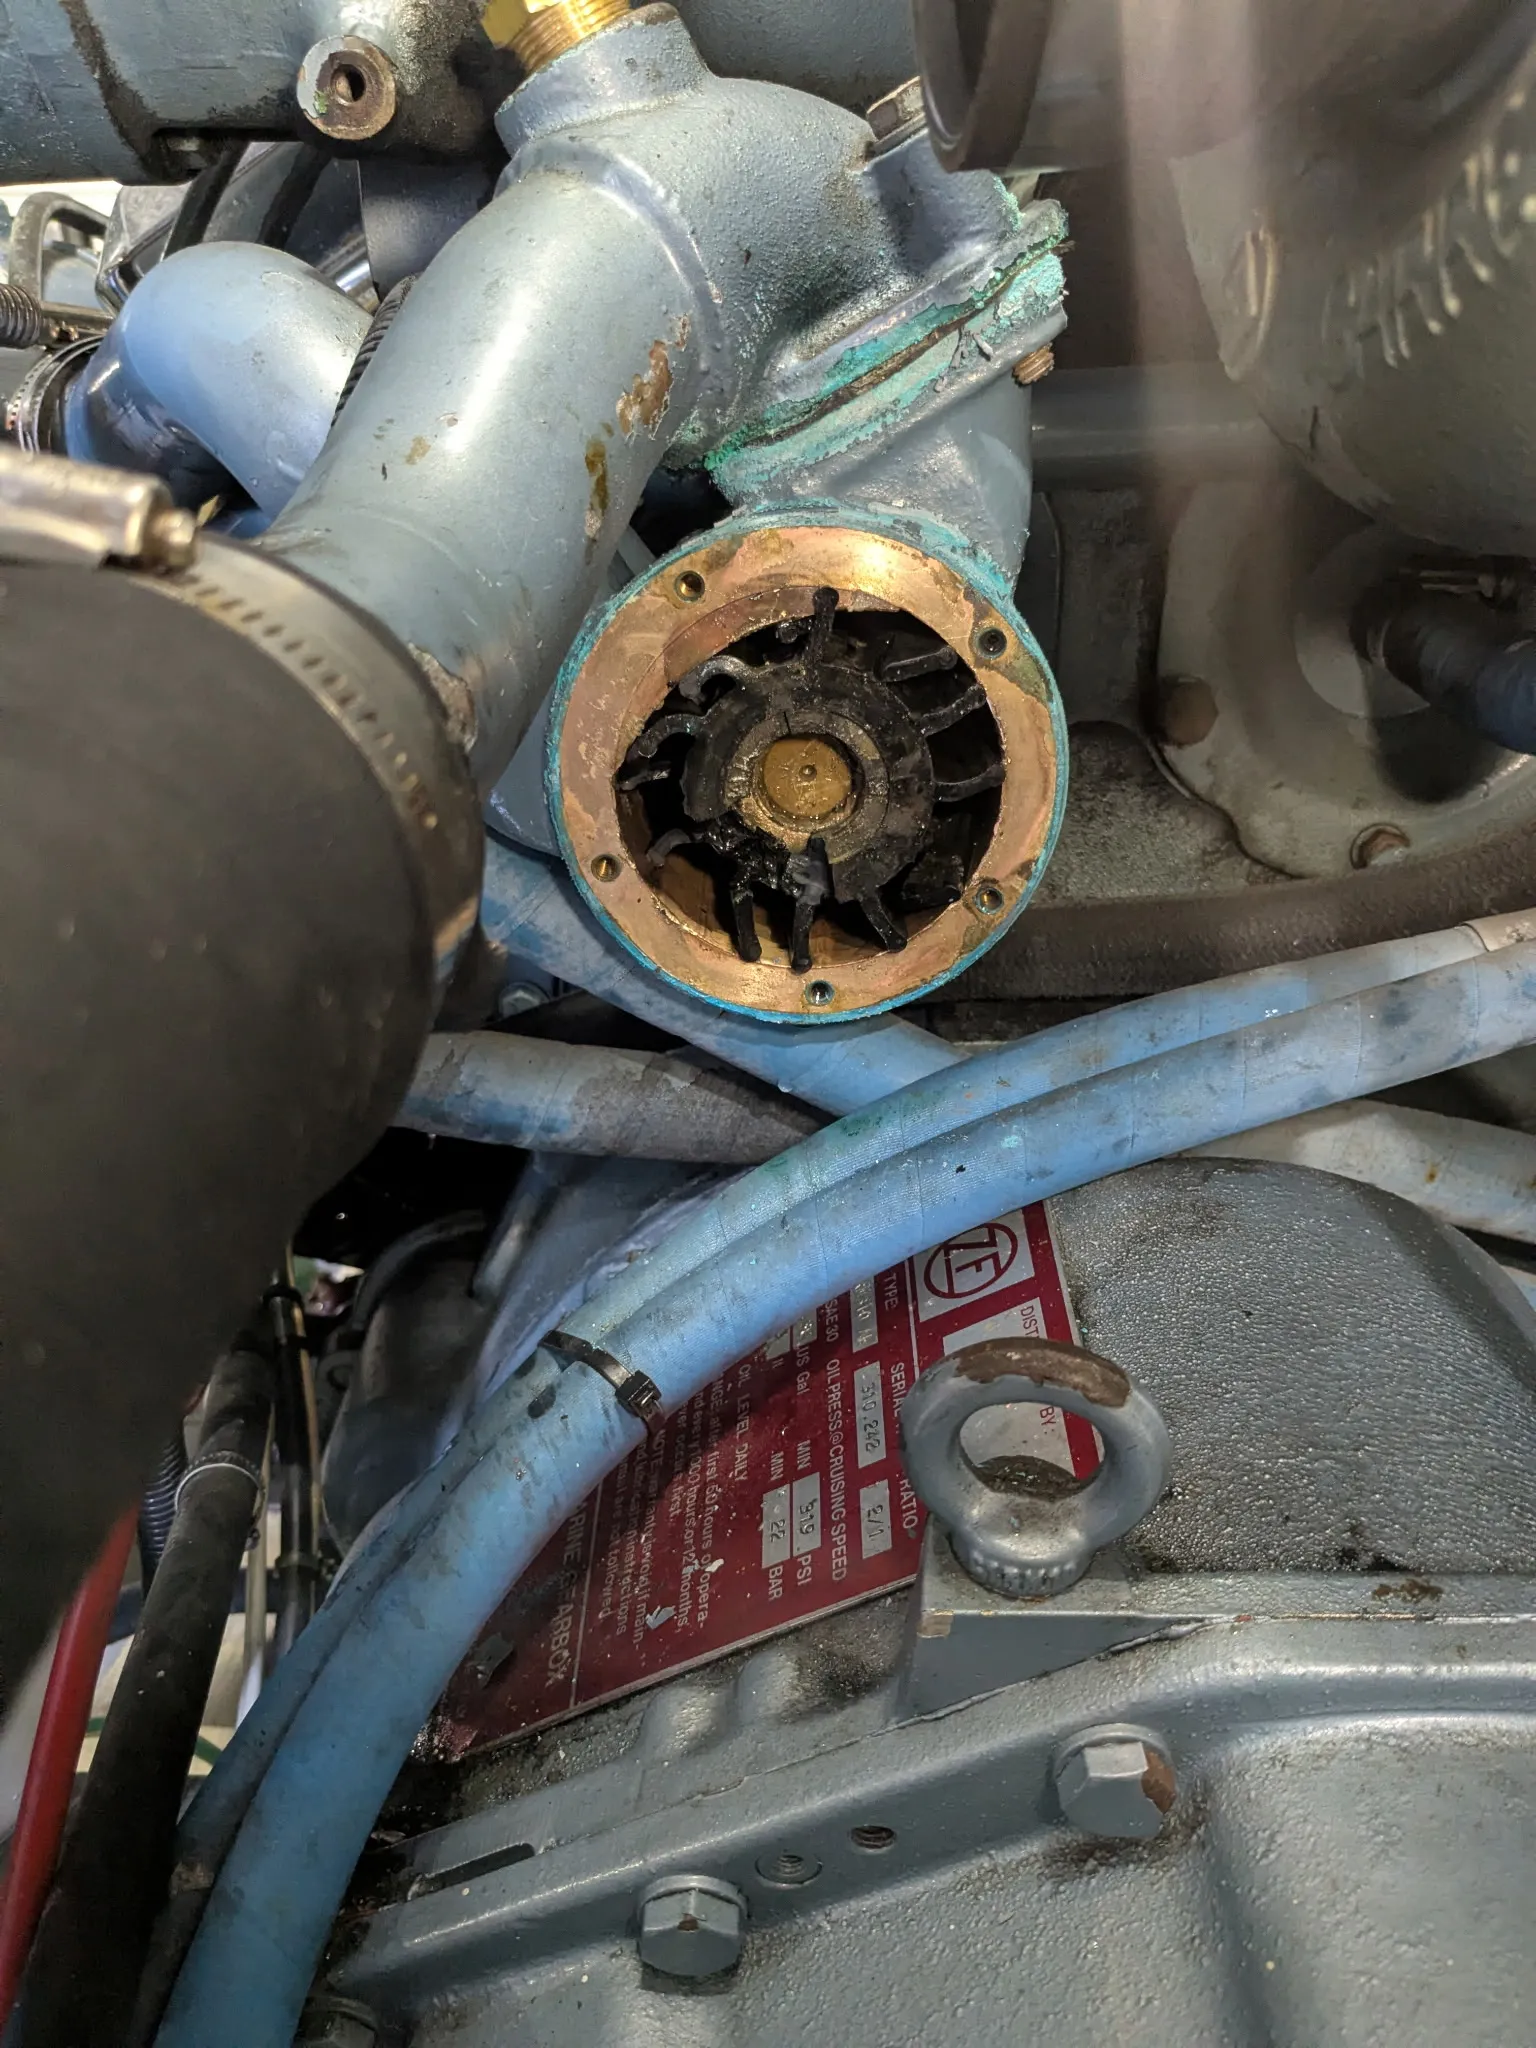
Is this a clean break of the vane or did small pieces go into the heat exchanger?
Safe Impeller Removal: Steps and Common Mistakes
Here is the part most people get wrong: impeller removal itself is one of the biggest causes of early failure. You can drop in a brand-new impeller and still have it die young if it is going into a housing that got banged up the last time someone yanked the old one out. The goal of safe removal is simple. Get the impeller out evenly, without prying against the housing or disturbing the sealing surfaces.
What Not to Do (Common Mistakes)
A lot of impeller failures are born right here, long before the new one goes in. The classics:
Prying with screwdrivers, picks, or channel locks
Hauling on it crooked so it comes out at an angle
Levering against the pump housing or backplate
Disturbing the rear gaskets or seals without realizing it
The frustrating thing is these rarely bite you on the spot. The pump goes back together, fires right up, looks great. Then weeks later you have got air intrusion, lost prime, overheating, and an impeller that keeps failing for no obvious reason. The reason was the screwdriver.
What Safe Removal Should Look Like
Done right, removal puts even, centered force straight on the impeller hub, not the vanes and not the housing. The impeller winds out smooth and steady, no prying, no twisting, no surprise pop. When the force stays even:
The housing stays round
The sealing surfaces stay clean
The next impeller seats right
You get full service life back
A Controlled, Step-by-Step Removal Method
Here is the approach that works, using a bearing-driven puller that pulls straight and centered:
Remove the pump cover and gasket
Expose the end of the shaft and find the cam
Center the puller arms across the impeller hub, away from the cam
Set the arms firmly into the impeller
Advance the threaded rod until it touches the shaft
Apply steady pressure with a wrench until the impeller winds out
The trick is alignment, not muscle. If the tool is not centered, stop and reset. Forcing a crooked pull is how you end up back at the top of this section.

Why This Matters Long-Term
Every bad pull leaves a little damage behind. Stack up enough of them and the housing loses its ability to hold an impeller evenly, which means faster wear and a cooling system that keeps acting up. Clean removal breaks that cycle. It is about control, not brute strength, which is exactly why purpose-built tools exist for this job.
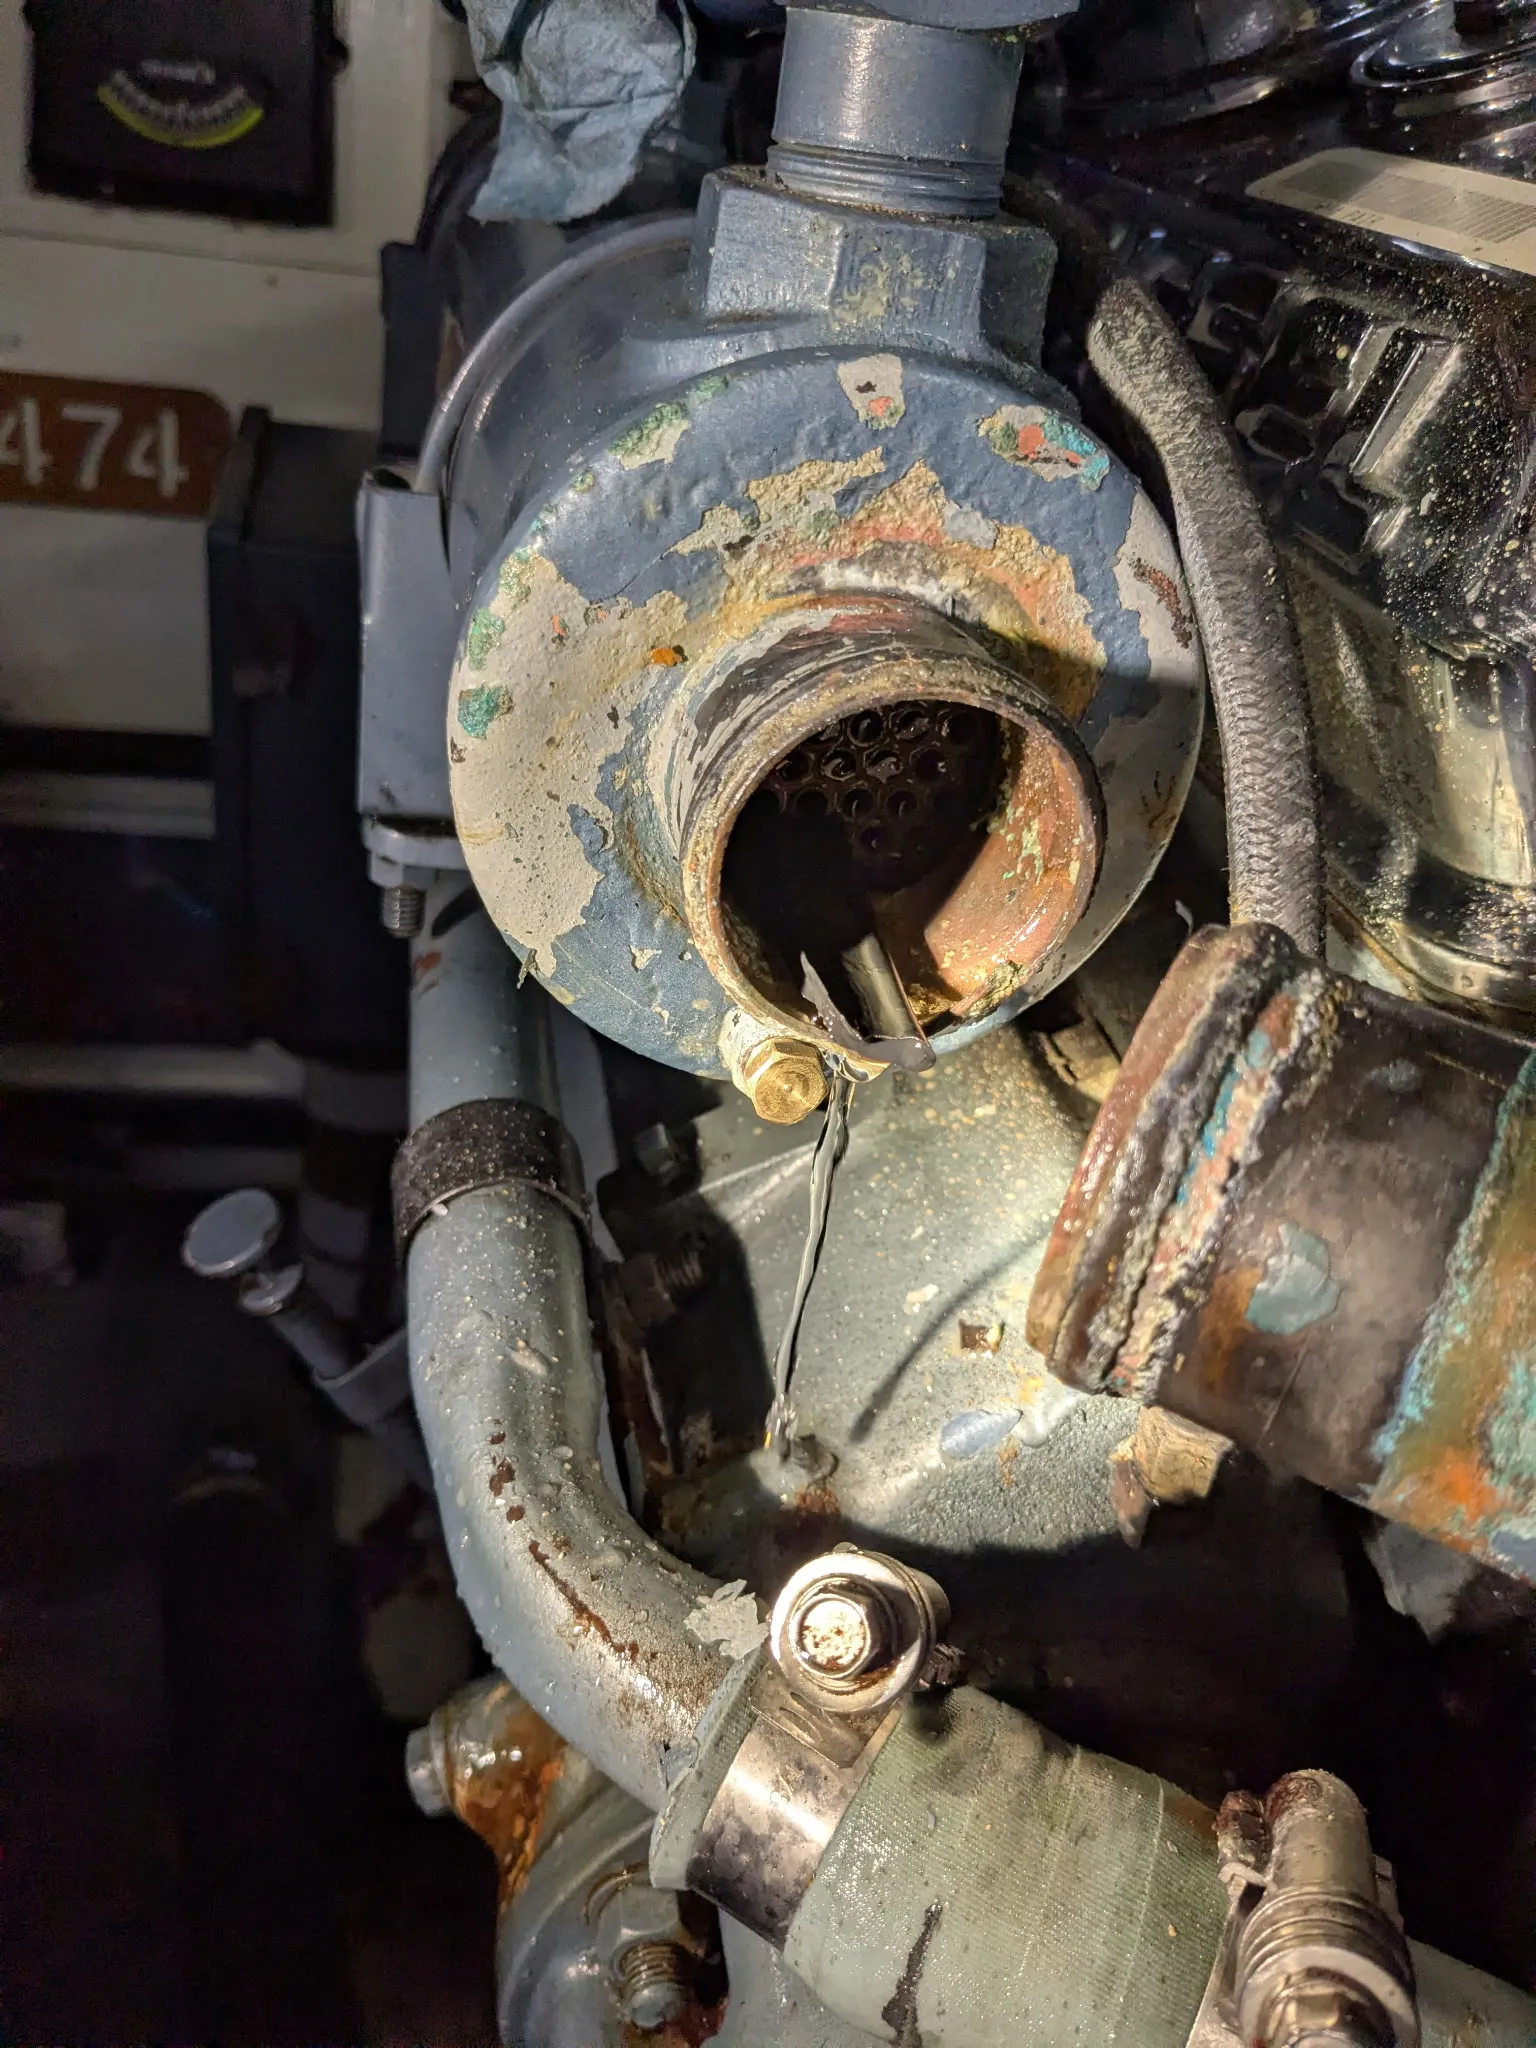
What to Inspect After Impeller Removal
Once the impeller is out, do not slam the new one in just yet. Two minutes of inspection now can save you the whole job over again later.
Run your fingers across every interior surface: the housing, the shaft, the wear plate. You are feeling for grooves, scoring, or roughness your eyes will miss, especially deep in the pump where the light does not reach. Any ridges under your fingertips mean something chewed up that surface. It should feel like glass.
What to check:
Pump housing and wear plate. Look for deep scratches, pitting, or heat damage. Brass should be smooth. If the wear plate is scored or not flat, replace it.
Gaskets and O-rings. Replace anything cracked, squished, or deformed. A bad gasket lets air in, and air means lost prime and weak cooling.
Debris. Clear out every rubber fragment, every grain of sand. Leave nothing behind.
Why bother? A scored housing cannot hold suction. Even with a fresh impeller, the pump will struggle to move water, and you are right back to overheating under load and a short impeller life. The little stuff you catch now is the big repair you skip later.
Quick new-impeller death. Rough, gouged surfaces will shred a new rubber impeller in short order.
Shorter system life. Keep running a damaged housing and you risk eroding the casing and, eventually, the engine itself.
What to do about it:
Replace the housing. Deep grooves or scratches? Swap the whole water pump housing, or use a rebuild kit that includes a new housing and wear plate.
Hunt down debris. If the old impeller came apart, track down every piece before it clogs something downstream.
Lube the new one. Use marine or water-based grease on the new impeller until water flow kicks in.
Tools and ImpelPro: A Professional Approach to Impeller Removal
Mechanics do not get better results because they are stronger or more patient than you. They get them because they use a method and the right tool, the kind that protects the part instead of fighting it. That is the whole idea behind ImpelPro: take the way a pro does it and hand it to the person doing this in their own slip on a Saturday.
ImpelPro is a compact, bearing-driven impeller puller built for flexible-vane water pump impellers on inboard marine engines and generators. Instead of prying or hauling at an angle, it puts centered, controlled force right on the impeller hub, so the impeller winds out smooth under steady pressure.
That clean pull is what protects the housing, the sealing surfaces, and the rear gaskets that the next impeller depends on. Keep those surfaces happy and your replacement impeller seats right, runs cool, and lasts as long as it should.
It is made from marine-grade 316L stainless steel and aluminum alloy, built for tight engine spaces and years of use. The bearing does the hard part, the piercing teeth grip without slipping, and the compact design works one-handed in spots where a traditional puller would not even fit. One honest note: those teeth pierce the old impeller as they grip it, so plan on installing a new one after every pull. That is the job anyway.
Want the full breakdown? What Makes ImpelPro Different from Other Impeller Removal Tools
The Takeaway
Impeller failures are not bad luck. They come from choked water flow, aging rubber, or damage done during removal and install. Almost all of it is preventable. Learn the early warning signs, swap the impeller on a schedule, and pull it out in a way that protects the pump instead of beating it up, and impeller service stops being a dreaded chore and starts being a non-event.
Your next impeller swap is your chance to break the cycle. Right habits, right tool, and a small rubber part stays a small rubber part. Which means more weekends spent on the water, and fewer spent staring at a temperature gauge wondering where it all went wrong. See how ImpelPro approaches impeller maintenance
FAQ
What happens if a boat impeller fails? A failed impeller stops pumping enough raw water to cool the engine, so the engine overheats within minutes and can suffer warped parts and exhaust damage if you keep running it. Shut the engine down as soon as you see the signs, such as a weak exhaust stream, a rising temperature gauge, or black rubber bits in the strainer.
Can you still run the engine with a failing impeller? No. Running an engine with a failing impeller risks fast overheating and expensive secondary damage. Shut down, find the cause, and replace the impeller before running again.
What are the first signs of impeller failure? The earliest signs are subtle: a longer delay before cooling water appears at startup, a weaker exhaust stream at the same RPM, and a slow rise in operating temperature. Black rubber bits in the sea strainer and a rubber smell in the engine room point to a more advanced failure.
How often should you replace a boat impeller? Replace it on a schedule rather than waiting for symptoms, since the rubber hardens with age, heat, and salt even when the engine runs fine. A common interval is once a year or per your engine manufacturer's guidance, whichever comes first.
Why do new impellers sometimes fail quickly? A new impeller often fails fast because it was installed into a housing that was scored or damaged during the previous removal. Rough surfaces cut the new rubber and ruin suction, which is why inspecting the housing and removing the old impeller cleanly both matter.
About the Author
Eddie Protzeller is a Seattle tugboat and marine mechanic, and the inventor of the ImpelPro® Impeller Puller. With 15 years servicing inboard engines and generators, he designed ImpelPro after fighting a badly stuck impeller in a tight engine compartment. He specializes in boat cooling systems and impeller maintenance. Learn more on the About Us page.